
Syhunt Code: Getting Started
The information in this document applies to version 7.0.13 of Syhunt Code.
Table of Contents
How to perform a code scan
Syhunt's whitebox scan (source code scan) can uncover multiple classes of application vulnerabilities and also identify key areas of the code that need review. Its static source code analysis functionality can detect over 40 vulnerability types, including the 2019 CWE Top 25 Most Dangerous Software Errors and the OWASP mobile top 10 security risks. Initially only PHP was supported. As of today, multiple web and mobile programming languages are supported.
Supported Languages (Web)
| ASP Classic (VBScript & JavaScript) |
| ASP.Net (C# & VB.Net) |
| Java (JEE / JSP) |
| JavaScript (Client and Server-Side, Node.js, Angular, AngularJS, Express.js & Koa.js) |
| Kotlin (Ktor) |
| Lua (ngx_lua, mod_lua, CGILua & Lua Pages) |
| Object Pascal (Delphi XE and older, Lazarus & DWS) |
| Perl |
| PHP |
| Python (CGI, Django, mod_python & WSGI) |
| Ruby (Rails & ERB) |
| TypeScript (Client and Server-Side, Node.js & Angular) |
Supported Languages (Mobile)
| Java (Android) |
| Kotlin (Android) |
| Swift (iOS) |
| Objective-C, C & C++ (iOS) |
| Object Pascal (Delphi XE) |
| JavaScript (including Node.js, Angular, AngularJS, Express.js & Koa.js) |
Follow along with this guide to learn how to perform a source code scan and generate a vulnerability report.
- Launch Syhunt Hybrid and click the Syhunt Code icon or New Scan button in the welcome page.
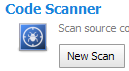
- Select a source code directory, source file, APK file or repository to scan.
- Select a scan method. We recommend the Application Code Scan (Default) method, which scans for all vulnerabilities using the recommended settings - the different methods are explained in the Hunt Methods document.
- Press the OK button to start the scan.
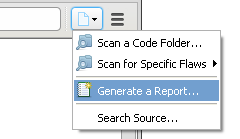
In the end of the scan, you can click Generate a Report to save the results as a HTML report or any other prefered format.
How to perform a code scan via command-line
- Go to the directory Syhunt is installed using the command prompt.
- Use the following command-line:
scancode [target] -hm:[a huntmethod]]
// Examples:
scancode git://sub.domain.com/repo.git
scancode https://github.com/user/repo.git -rb:master
scancode /source/www/
TFS repositories and local Windows path:
// Local path
scancode c:\source\www\
scancode c:\source\www\file.php
scancode c:\mobile\myapp.apk
scancode "c:\source code\www\"

// TFS repositories
scancode https://dev.azure.com/user/project
scancode https://myserver/tfs/project
scancode collection:https://dev.azure.com/user$/project
Syhunt scancode tool reports are automatically generated and saved unless -nr parameter is provided. You can also open the session by launching Syhunt and using the  Menu -> Past Sessions option.
The following parameters can be provided when calling the scancode tool, all of which are optional:
| Parameter | Description | Default Value |
| sn:[name] | A session name that must be unique. If omitted, an unique ID will be generated and assigned | auto generated ID |
| hm:[name] | the Hunt Method to be used during the scan. If omitted, the default method will be used | appscan |
| rb:[branch] | Sets a GIT repository branch | |
| tfsv:[version] | Sets a TFS version | default |
| tk:[trackername] | Sends vulnerabilities to a tracker after scanning. Can be combined with the -pfcond parameter | |
| tk2:[trackername] | Same as above | |
| tk3:[trackername] | Same as above | |
| nr | Disables the report generation after scanning | |
| or | Opens report after generation | |
| rout:[filename] | Sets the report output filename and report format | Report_[session name].html |
| rtpl:[name] | Sets the report template | Standard |
| xout:[filename] | Sets the export output filename and report format | Export_[session name].xml |
| xout2:[filename] | Sets a second export output filename and report format | Export_[session name].xml |
| pfcond:[condition] | Sets a pass/fail condition to be reported | |
| nv | Turn off verbose. Error and basic info still gets printed | |
| inc:[mode] | Sets the incremental scan mode | targetpref |
| inctag:[name] | Optionally stores the incremental scan data within a tag | |
| excp:[pathlist] | Excludes paths from the analysis (eg: -excp:/path/*,/path2/* | |
| refurl:[url] | Sets an URL associated with the current source code for reference purposes only | |
| noifa | Disables input filtering analysis | |
| tml:[time] | Sets the maximum scan time limit (eg: 1d, 3h, 2h30m, 50m) | No limit |
| about | Displays information on the current version of Syhunt | |
| help (or /?) | Displays the list of available parameters | |
Advanced Features
Preventing Antivirus Interference in Pipeline Integration
During a source code analysis of a large codebase with many files, Syhunt scans every file in the target repository. If you have real-time antivirus protection enabled, this can significantly slow down the scan. This slowdown occurs because the antivirus scans all source code files that Syhunt opens.
For example, in our tests on a machine with Microsoft Defender enabled, scanning a PHP repository with around 10,000 files increased the scan duration by 10 minutes and raised CPU usage by 25% due to the Antimalware Service (MsMpEng.exe). In a pipeline integration, these 10 minutes can be crucial.
To resolve this issue, you should add a Process exclusion to Defender. This exclusion type ensures that the files opened by the Syhunt process are not scanned by the antivirus, unlike a File exclusion, which excludes only the process itself from analysis.
Here's how to add a Process exclusion in Microsoft Defender:
- Select Start, then open Settings.
- Under Privacy & security, select Virus & threat protection.
- Under Virus & threat protection settings, select Manage settings.
- Under Exclusions, select Add or remove exclusions, and then choose Process.
- Enter the full path of the Syhunt Code scanner executable:
C:\Program Files\Syhunt Hybrid\ScanCode.exeand click the Add button.
If you use antivirus software from another manufacturer, refer to their documentation to apply a similar exclusion.
Preventing a Code Vulnerability From Being Reported
You can prevent specific vulnerabilities from being reported through ignore IDs or rules: just create a .vulnignore file in the root directory of the code repository or directory to be scanned. Each line of this file can contain a different ignore ID or rule.
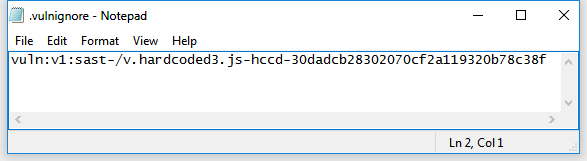
Ignore IDs are shown in reports at the end of each vulnerability entry and are the recommended and easiest way to ignore vulnerabilities in Syhunt. Alternatively, you can create and add Ignore Rules that can apply to wider scenarios.
Differences between Hunt Methods
| Hunt Method | CLI name | Type | Brute F. | Injection | DoS | Time-Con. |
| Application Scan (Default) | appscan |  | Y | Y | Y | N |
| Application Scan (Server-Side Focused) | appscanss | | Y | Y | Y | N |
| Structure Brute Force | structbf |  | Y (Deep) | N | N | Y (Very) |
| Old & Backup Files | fileold | | Y | N | N | Y |
| Fault Injection | faultinj | | N | Y | Y | N |
| Top 10 (OWASP) | top10 | | N | P (TOP10) | Y | N |
| Top 10 Mobile (OWASP) | top10mob |  | N | P (TOP10MOB) | N | N |
| Top 25 (CWE) | top25cwe | | N | P (TOP25) | Y | N |
| Top 5 (OWASP PHP) | top5php | | N | P (TOP5) | N | N |
| Cross-Site Scripting | xss | | N | P (XSS) | N | N |
| SQL Injection | sqlinj | | N | P (SQL) | N | N |
| File Inclusion | fileinc | | N | P (FI) | N | N |
| Unvalidated Redirects | unvredir | | N | P (UR) | N | N |
| Malware Content | malscan | | P (Malware) | P (Malware) | N | N |
| Passive | passive | | N | N | N | N |
| Spider Only | spider | | N | N | N | N |
| Complete Scan | complete | | Y | Y | Y | Y (Very) |
| Complete Scan, No DoS | compnodos | | Y | Y | N | Y (Very) |
| Complete Scan, Paranoid | comppnoid | | Y (Deep) | Y | Y | Y (Very) |
Letters: Yes/No/Partial (Y/N/P)
Type of Testing
- - Hybrid (Gray Box), Dynamic & Code
- - Dynamic Only (Black Box)
- - Code Only (White Box)
Time-Consuming
A Yes means that extra checks and attack mutations will be performed and the number of checks will be influenced by the number of directories found during the spidering stage.
Description
The Application Scan method is the default scan method in Syhunt. If you want to use a different scan method, you will be able to select one of the following options:
Application Scan
Identifies flaws in custom web applications, web server software and third-party components. This scan method crawls the web site and performs attacks against the web site structure and the web applications. This includes looking for fault injection vulnerabilities such as XSS, SQL Injection, File Inclusion, and more.
Structure Brute Force
A structure brute force will check for:
- Common Vulnerable Scripts
- Common File Checks
- Custom File Checks (User File Checks)
- Database Disclosure
- Web-Based Backdoors
The number of checks is influenced by the number of directories found during the spidering stage.
Old & Backup Files
Executes extension checking around the mapped web site structure.
OWASP Top 10
Scans specifically for the OWASP Top 10 2017 vulnerabilities:
- A1 2017: Injection
- A2 2017: Broken Authentication
- A3 2017: Sensitive Data Exposure
- A4 2017: XML External Entities (XXE)
- A5 2017: Broken Access Control
- A6 2017: Security Misconfiguration
- A7 2017: Cross-Site Scripting (XSS)
- A8 2017: Insecure Deserialization
- A9 2017: Using Components with Known Vulnerabilities
- A10 2017: Insufficient Logging & Monitoring
CWE Top 25
Scans specifically for the 2019 CWE Top 25 Most Dangerous Software Errors.
See the full list at: https://cwe.mitre.org/top25/archive/2019/2019_cwe_top25.html
OWASP PHP Top 5
Scans specifically for the OWASP Top Five List of PHP Vulnerabilities:
- Remote Command Execution
- Cross-Site Scripting (XSS), including DOM XSS
- SQL Injection
- PHP Misconfiguration
- File System Attacks, including File Inclusion
Fault Injection
Scans specifically for fault injection vulnerabilities. If this scan method is selected, all other checks that does not require injection are disabled and Syhunt will then specifically check for SQL injection, XSS, file inclusion, and similar flaws.
Cross-Site Scripting (XSS)
Scans specifically for XSS vulnerabilities, including DOM XSS.
SQL Injection
Scans specifically for SQL & NoSQL Injection vulnerabilities.
File Inclusion
Scans specifically for File Inclusion and Directory Traversal vulnerabilities.
Unvalidated Redirects
Scans specifically for Unvalidated Redirect vulnerabilities.
Malware Scan
Scans specifically for malware content, such as:
- Web Backdoors
- Malicious Content
- Hidden Debug Parameters
Passive Scan
Maps the web site structure and reports vulnerabilities discovered without launching any kind of attacks, such as:
- Vulnerabilities in Client-Side JavaScript
- Various Form Weaknesses
- Web Technology Disclosure
- Insecure HTTP Headers
- Outdated, Vulnerable Server Software
- Outdated, Vulnerable Referenced Scripts
- Suspicious HTML Comments
- Source Code Disclosure
- Malicious Content being served
Spider Only
Maps the web site structure without testing or reporting any kind of vulnerability or weakness.
Complete Scan
Scans for all kinds of web application vulnerabilities using all kinds of mutantions and pen-tester methods, including Header Manipulation attacks. A Complete Scan can sometimes be very time-consuming when performed against a web server that has a large quantity of web folders and entry points.
Complete Scan (No DoS)
Same as before, but with denial-of-service tests disabled.
Complete Scan (Paranoid)
Scans for all kinds of web application vulnerabilities using deep structure brute force, all kinds of mutantions and pen-tester methods, including Header Manipulation attacks. This scan method can be very time-consuming, specially when executed against large web sites. This method also executes triple checking structure brute force, which applies to case-sensitive servers - Syhunt will try all file name possibilities (all uppercase, all lowercase, all leading capitals, etc).
How To Schedule a Scan
Adding and configuring a scheduled scan is an easy task:
- Click the Scheduled Scans icon
 in the launcher toolbar. The Scheduled Scans screen will open.
- Click the Add Scheduled Scan icon
 in the Scheduled Scans screen toolbar.
- Enter a reference name for the new scheduled scan (like MyScan) and hit OK. A preferences dialog window will open.
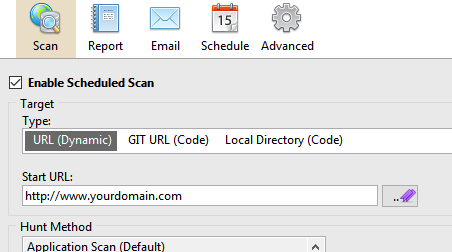
- In the Scan tab, enter the scan target details and select the desired scan method and options.
- In the Report tab, enter the desired report generation options.
- In the Schedule tab, enter the desired event plan.
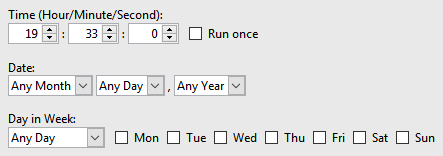
- Click the OK button when you're done.
Sending Reports Via Email
Firstly, you have to add an Email tracker:
- Click the Issue Trackers icon
 in the launcher toolbar. The Issue Trackers screen will open.
- Click the Add Tracker icon
 in the Issue Trackers screen toolbar and choose the Add tracker: Email menu option.
- Enter a reference name for the new tracker (like Mail) and hit OK. A preferences dialog window will open.
- Enter Sender/Recipient email addresses.
- Enter the SMTP Authentication host and credentials and click the OK button.
- Click the Scheduled Scans icon in the launcher toolbar. The Scheduled Scans screen will open.
- Right-click the scheduled scan and click the Edit Schedule Preferences option. A preferences dialog window will open.
- Go to the Email tab and check the Automatically email report after generation option.
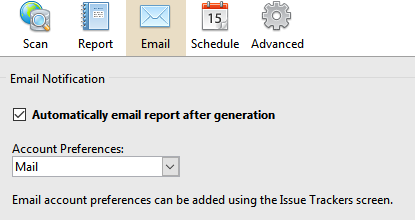
- Select the account preferences.
- Click the OK button when you're done.
Reviewing results from scheduled scans
At any time you can see the results of past and current scans and generate a report. Just launch the Syhunt Hybrid application and click the Past Sessions icon in the launcher toolbar.
Working with Third-Party Launchers and Schedulers
See this document on how to start Syhunt from within third-party task schedulers, Jenkins and other launchers
Customizing the Report
Before saving a report, you can change the language and add a logo that will be included with any generated reports from now on:
- Click the Edit Report Preferences button in the toolbar. The Report Preferences dialog will open.
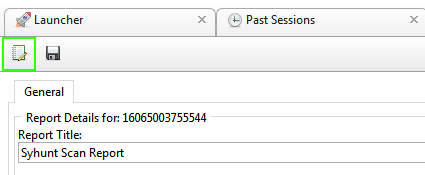
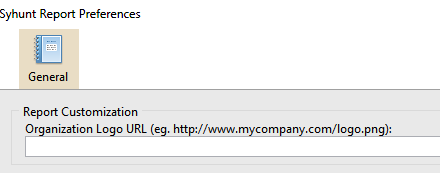
- Enter the image URL containing the logo
- Select a desired output language.
- Click OK to save the preferences.
Now when you generate a report, it will contain your organization logo instead of Syhunt's logo.
System Requirements
Syhunt Hybrid (including its Community Edition) can be installed on 64-bit versions of Windows or Linux, but it is able to analyze applications designed for any target platform, including Android, Apple iOS and macOS, BSD, Linux, Windows, Solaris and Unix, independently of the platform it is executed from.
- 4GB of available RAM (8GB recommended)
- 2GB of free disk space*
- Internet Connection (recommended for code scans and dynamic scans and some features)
- One of the following compatible 64-bit operating systems:
- Windows 10 or 11, or Windows Server 2012 to 2022 (x64 or ARM64). On Windows Server, it is important to ensure that you have the WebView2 Runtime installed. If the WebView2 Runtime is not installed, Syhunt will issue a warning when launching its user interface. You can find it in the Evergreen Standalone Installer.
- Make sure you have Edge preloaded on system startup. On Windows 10, Edge preload is already a default system setting. On Windows Server, you have to enabled the Edge preload manually. On Windows 11, our tests showed that disabling the Edge preload would not make any difference.
- Ubuntu Server or Desktop 18 or higher
- CentOS 7 or 8 (Minimal or Everything)
- Any unofficially supported OS**, like a Linux distribution such as the ones listed below, or macOS Big Sur or higher (Intel).
- Windows 10 or 11, or Windows Server 2012 to 2022 (x64 or ARM64). On Windows Server, it is important to ensure that you have the WebView2 Runtime installed. If the WebView2 Runtime is not installed, Syhunt will issue a warning when launching its user interface. You can find it in the Evergreen Standalone Installer.
- (Optional) GIT on Linux/macOS or GIT for Windows (optional for GIT repository scans)
- Java or Java Headless installed on Linux/macOS
- If native binary is not available for your specific OS type or distribution yet, Wine64 Stable (3, 4 or 5) is required to be installed.
- (Optional) Java 8 or higher (optional for Android APK file scan)
- (Optional) Python 3.7.0 or higher, Selenium module and Chrome browser version 109 or higher (optional for extended scripting capabilities)
- (Optional) OpenAI API key to enable AI-powered features
* This does not include the space required to save scan session data, which varies depending on the website or source code being analyzed and the scan frequency.
** Unofficially supported OS: means that while the product has been successfully tested and the installation process has been documented, Syhunt does not provide technical support or assistance for issues related to the product's performance on that particular OS. If you choose to use the product with an OS that is not officially supported, you may encounter compatibility issues, errors, or bugs. Therefore, it is always recommended to use a supported OS to ensure optimal performance and compatibility with the product.
Compatible Linux Distributions
Officially Supported:
Ubuntu Server/Desktop 18.10 and later
CentOS 7.7 and later (Minimal or Everything)
Unofficially (Successfully Tested):
Kali Linux 2019 and later
Parrot OS 4.1, 4.7 and later
Debian 9.11 and later
Linux Mint 19.2 and later
OpenSUSE Leap 15.1 and later
Fedora 32
MX Linux 19.1 and later
KDE Neon 2020.03 and later
Deepin 15.9
Manjaro 19
Arch Linux 2019 and later
Unsupported:
Elementary OS 5.1 (Successfully Tested), 5.0 (Unsupported)
CentOS 6.1 (Successfully Tested)
Solus 4.1 (Unstable)

For additional product documentation, visit syhunt.com/docs