Integrating with Third-Party Schedulers
The information in this document applies to version 6.7 of Syhunt Hybrid.
Syhunt can be easily started from within third-party task schedulers, such as xStarter and System Scheduler, CI tools like Jenkins, and launchers.
Before Starting
Firstly, create a disabled scheduled scan that will be used to generate the command-line parameters that will be needed to start the scan.
- Launch the Syhunt Hybrid application.
- Click the Scheduled Scans icon
 in the launcher toolbar. The Scheduled Scans screen will open.
- Click the Add Scheduled Scan icon in the Scheduled Scans screen toolbar.
- Enter a reference name for the new scheduled scan (like MyScan) and hit OK. A preferences dialog window will open.
- Uncheck Enable Scheduled Scan.
- Enter the scan target details and select the desired scan method and options.
- Go the Report tab and select the desired options. Enter a filename in the Report Filename field (eg C:\Reports\demo.pdf) if you want to send it over email or perform some other similar task later. Click the OK button when you're done.
- Finally, right-click the scheduled scan and click the CLI Parameters -> Copy Filename & Parameters menu option. Paste it to a temporary location like Notepad.
Method 1: Using xStarter
This is our favorite scheduler - it can be configured to run as a NT Service and allows the execution of multiple actions before or after a scan operation, such as sending email notifications and much more.
- Download xStarter from http://www.xstarter.com/ and install it using its default options.
- Launch the xStarter application.
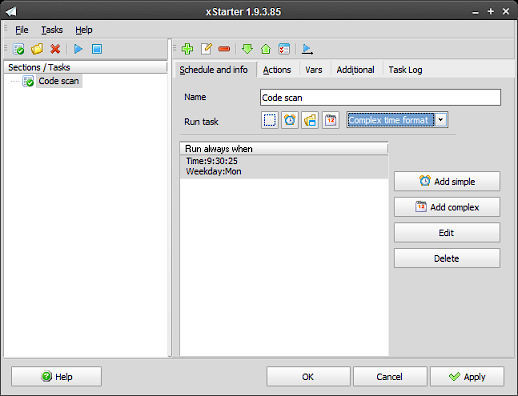
- Create a New task, enter the desired schedule settings using the Schedule and info tab
- Go to the Actions tab and add a new action of type Processes -> Run Process
- Copy and paste the generated filename to the Filename edit in the xStarter Action Params dialog.
- Copy and paste the generated parameters to the Parameters edit in the xStarter Action Params dialog
- Change Window to Hidden and check the Console process option.
- Click the OK button.
- At this point, you can add additional actions after or before the scan operation if you prefer, such as Internet -> Mail -> SendMail. For more details, see below.
- Click the Apply button when you're done.
Sending Reports Via Email
- Add a new action of type Internet -> Mail -> SendMail
- Enter the sender email address in the Address field (eg: yourmail@yourhost.com)
- Enter the SMTP host in the Mail host field (eg: smtp.yourhost.com). Configure the appropriate port if necessary.
- Enter the email account in the Username and Password fields.
- Enter the email that will receive the report in the To field. Also enter the appropriate Subject and Message and any desired additional settings using the Additional tab.
- Enter in the Attach file(s) area the location where the scan report will be saved (eg: C:\Reports\demo.pdf). The filename must be identical to the one you entered in the Report Filename field when you generated the command line using the Syhunt Hybrid application.
Method 2: Using System Scheduler Free Version
- Download the free version of the System Scheduler from https://www.splinterware.com/download/index.html
- Launch the System Scheduler application.
- Create a New Event of type Run Application with a desired title
- Copy and paste the generated filename to the Application edit in the System Scheduler - Event dialog
- Copy and paste the generated parameters to the Parameters edit in the System Scheduler - Event dialog
- Change State to Hidden.
- Go to the Schedule tab, select the desired schedule type and enter the desired schedule settings
- Click the Save button and it's done.
Method 3: Using Jenkins
Firstly, read our guide on how to integrate Syhunt into Jenkins and execute Syhunt from within a Jenkins Pipeline script.
- From the Jenkins Dashboard, open the desired pipeline item.
- Click Configure from the sidebar links
- Go to the Build Triggers tab, check the "Build periodically" option and enter the appropriate schedule
- Click the Save button to update the pipeline configuration
For additional product documentation, visit syhunt.com/docs