Integrating Syhunt into GitLab
The information in this document applies to version 6.9.8.2 of Syhunt Hybrid.
Table of Contents
Introduction
Launching Syhunt scans from within a GitLab CI YML script is simple and straightforward, allowing you to integrate the Syhunt Dynamic, Syhunt Code and Syhunt Mobile security testing tools into your continuous delivery pipeline and security dashboard, schedule scans and more. You can also configure GitLab issue trackers in Syhunt, allowing vulnerabilities to be submitted to the issues area of projects.
The following example Gitlab CI YML script will scan the current repository source code, failing the job if medium or high vulnerabilities are identified. In addition to this, it attachs a PDF vulnerability report to the pipeline job artifacts and adds the identified vulnerabilities to GitLab's security dashboard.
syhunt_test:
  script:
          - Start-CodeScan -pfcond 'medium' -output 'report.pdf' -outputex 'gl-sast-report.json'
  artifacts:
    reports:
      sast: gl-sast-report.json
    paths:
    - report.pdf
    when: on_failure
  tags:
   - syhunt
Activating a Syhunt Runner
Syhunt Runner is a CI service that will receive scan requests, execute scans and communicate the scan results with GitLab.
IMPORTANT: For security and performance reasons, it is advised that the Runner is installed on a separated virtual machine or dedicated physical machine.
- First, go into your GitLab project settings and access the CI (Continuous Integration) options:
- Click Settings
- Click CI / CD
- Expand Runners
- Scroll down to Set up a specific Runner manually
- Save the registration token to a safe location. You will need it later below.
- Install with its default settings Git for Windows, which can be downloaded at https://gitforwindows.org/
- Install with its default settings Syhunt Hybrid (syhunt-hybrid-7.0.14.0.exe)
- Download and run the Syhunt Runner (syhunt-runner-15.0.0.exe). After launching the setup, you will be prompted for the runner registration information.
- Paste the registration token you copied in the token text field and click Next to continue and complete the install.
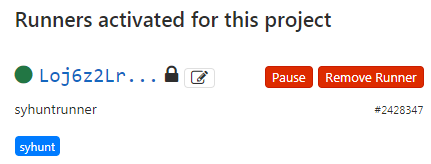
After finishing installing, return to GitLab, and the Runners section we were just on, and press F5 to refresh the screen. The syhuntrunner should now be registered for this project. You will see it listed under Runners activated for this project at the bottom of the page, as shown in the screenshot below.
Syhunt is now ready to be called from CI YML scripts! See examples below
Adding Syhunt to your CI YML script
If you don't have a CI YML file in your repository, go to Project overview and click Set up CI/CD. This will create a .gitlab-ci.yml file within the repository.
SAST Example - The following example Gitlab CI YML script will scan the current repository source code, failing the job if medium or high vulnerabilities are identified. In addition to this, it attachs a PDF vulnerability report to the pipeline job artifacts and adds the identified vulnerabilities to GitLab's security dashboard.
syhunt_test:
  stage: test
  script:
          - Start-CodeScan -pfcond 'medium' -output 'report.pdf' -outputex 'gl-sast-report.json'
  artifacts:
    reports:
      sast: gl-sast-report.json
    paths:
    - report.pdf
    when: on_failure
  tags:
   - syhunt
DAST Example - The following example Gitlab CI YML script will scan the live web application after going into production, failing the job if medium or high vulnerabilities are identified. In addition to this, it attachs a PDF vulnerability report to the pipeline job artifacts and adds the identified vulnerabilities to GitLab's security dashboard.
production:
stage: deploy
  script:
          - Start-DynamicScan -target 'www.productionurl.com' -pfcond 'medium' -output 'report.pdf' -outputex 'gl-dast-report.json'
  artifacts:
    reports:
      sast: gl-dast-report.json
    paths:
    - report.pdf
    when: on_failure
  tags:
   - syhunt
only:
  - tags
# SAST Example - Scan local directory/repository
Start-CodeScan -pfcond "medium"

# SAST Example - Scan a remote project repository
$MyProject = @{
  target = 'https://github.com/syhunt/vulnphp.git';
  branch = 'main';
  pfcond = 'medium';
  output = 'report.pdf'
}
Start-CodeScan @MyProject

# DAST Example - Scan URL
$MyWebsite= @{
  target = 'https://www.somewebsite.com';
  pfcond = 'medium';
  output = 'report.pdf'
}
Start-DynamicScan @MyWebsite
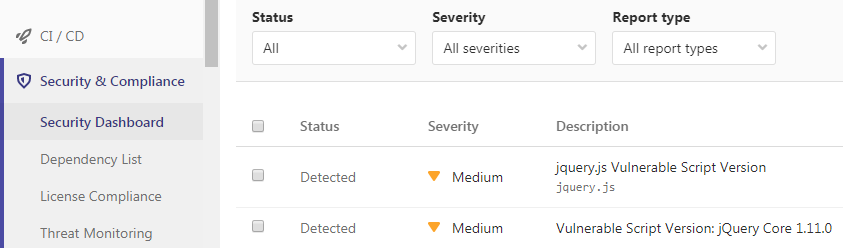
Integrating with GitLab's Security Dashboard
Syhunt will generate a GitLab-compatible vulnerability report file if the outputex parameter is simply set to:
- SAST: gl-sast-report.json or anyfilename.gls.json
- DAST: gl-dast-report.json or anyfilename.gld.json
Remember to add the filename to artifacts.reports.sast or artifacts.reports.dast to your CI YML file like shown in the first example above to activate the integration.
At the present time, GitLab will only add successfull pipelines to the security dashboard and vulnerability report areas of a project. This means that if you want all the identified vulnerabilities to be displayed within the dashboard, you should omit the pfcond parameter from the script line that calls Syhunt. Alternatively, if you provide a pass fail condition high and no high vulnerabilities are found, all medium-to-info identified vulnerabilities will be displayed within the dashboard.
This does not applies to the Security tab of Pipelines, the Security tab will always display all the vulnerabilities in both successful or failed status - however, if the pipeline failed due to a matched pass fail condition, you may see GitLab inconsistently show 0 vulnerabilities while still listing the identified vulnerabilities. This is a minor bug unaddressed by the GitLab team.
Important tip: If this is the first scan against a large codebase, it is recommended to scan your application without the dashboard integration activated to make sure you don´t have a large number of vulnerabilities. If a large number of vulnerabilities is found, improve the security state of the application by fixing the initial batch of vulnerabilities reported by Syhunt and only then enable the dashboard integration.
Start-DynamicScan Function
Syhunt Dynamic must be launched through the Start-DynamicScan() function. The following parameters must be provided when calling the Start-DynamicScan() function:
- target (required) - the target URL to be scanned (eg. http://www.somesite.com)
- huntmethod (optional) - the Hunt Method to be used during the scan, If omitted, the default method will be used.
- pfcond (optional) - allows the script to fail with proper exit code if a certain condition is met. See below a list of available pass/fail conditions.
- tracker (optional) - the name of previously created tracker or a dynamically generated tracker that will receive a summary of identified vulnerabilities at the end of the scan. Examples
- output (optional) - allows to set an output filename (eg. report.pdf or report.html).
- outputex (optional) - allows to set a second output filename (eg. export.json).
- verbmode (optional) - $false by default. If changed to true, turns on verbose mode allowing information other than error and basic info to be printed.
- genrep (optional) - $true by default. If changed to false, Syhunt will not generate an output file.
- redirIO (optional) - $true by default. If changed to false, input and output from the Syhunt scanner will not be redirected to the console.
- timelimit (optional) - sets the maximum scan time limit (default: no limit). If the time is reached, the scan is aborted. Examples: 1d, 3h, 2h30m, 50m
When using the output or outputex parameters, all output formats supported by Syhunt are available. The report or export will be saved to the current working directory, unless a full path name is provided.
Examples:
# Example 1 - Scan URL with single line
Start-DynamicScan -target 'https://www.somewebsite.com' -pfcond 'fail-if:risk=mediumup'

# Example 2 - Scan URL
$MyWebsite= @{
  target = 'https://www.somewebsite.com';
  pfcond = 'medium';
  output = 'report.pdf'
}
Start-DynamicScan @MyWebsite
Start-CodeScan Function
Syhunt Code must be launched through the Start-CodeScan() function. The following parameters can be provided when calling the Start-CodeScan() function, all of which are optional:
- target - the target URL of a project repository to be scanned, or a local source code directory or file. If the target parameter is omitted, the current working directory is scanned.
- branch - the repository branch to be scanned. If the branch parameter is omitted, the git client will fetch the default branch.
- huntmethod - the Hunt Method to be used during the scan, If omitted, the default method will be used.
- pfcond - allows the script to fail with proper exit code if a certain condition is met. See below a list of available pass/fail conditions.
- tracker (optional) - the name of previously created tracker or a dynamically generated tracker that will receive a summary of identified vulnerabilities at the end of the scan. Examples
- output - allows to set an output filename (eg. report.pdf or report.html).
- outputex - allows to set a second output filename (eg. export.json).
- verbmode - $false by default. If changed to true, turns on verbose mode allowing information other than error and basic info to be printed.
- genrep - $true by default. If changed to false, Syhunt will not generate an output file.
- redirIO - $true by default. If changed to false input and output from the Syhunt scanner will not be redirected to the console.
- timelimit (optional) - sets the maximum scan time limit (default: no limit). If the time is reached, the scan is aborted. Examples: 1d, 3h, 2h30m, 50m
When using the output or outputex parameters, all output formats supported by Syhunt are available. The report or export will be saved to the current working directory, unless a full path name is provided.
Examples:
# Example 1 - Scan the current directory/repository
Start-CodeScan -pfcond "medium"

# Example 2 - Scan a remote GIT project
Start-CodeScan -target "https://github.com/someuser/somerepo.git" -huntmethod "normal" -pfcond "medium"

# Example 2 - Scan a remote Azure DevOps Services project
Start-CodeScan -target "https://dev.azure.com/user/projectname" -huntmethod "normal" -pfcond "medium"

# Example 4 - Scan a specific local directory
Start-CodeScan -target "C:\www\" -huntmethod "normal" -pfcond "medium"
Pass/Fail Conditions
 The following are the pass/fail conditions currently supported by Syhunt:
highorfail-if:risk=high- Fail if a High risk vulnerability or threat is foundmediumorfail-if:risk=mediumup- Fail if a Medium or High risk vulnerability or threat is foundloworfail-if:risk=lowup- Fail if a Low, Medium or High risk vulnerability or threat is found
Advanced Runner Settings
Update the concurrent value for Runners in C:\SyhuntRunner\config.toml to allow multiple concurrent jobs as detailed in advanced configuration details.
Integrating with GitLab Issues
Configuring an issue tracker is an easy task and vulnerabilities can be submitted to a specific project with the click of a button.
Firstly, If you have not done so already, you have to create a personal access token with API access permission:
- Log in to GitLab.
- In the upper-right corner, click your avatar and select Settings.
- On the User Settings menu, select Access Tokens.
- Choose a name and optional expiry date for the token.
- Choose the API scope.
- Click the Create personal access token button.
- Save the personal access token somewhere safe. Once you leave or refresh the page, you won’t be able to access it again.
Finally, you have to add a GitLab tracker:
- Click the Issue Trackers icon
 in the launcher toolbar in Syhunt. The Issue Trackers screen will open.
- Click the Add Tracker icon
 in the Issue Trackers screen toolbar and choose the Add tracker: GitLab menu option.
- Enter a reference name for the new tracker (like MyProjectName) and hit OK. A preferences dialog window will open.
- Enter the GitLab project name. Format must be owner/repo.
- Enter the GitLab Server URL, eg:
https://gitlab.com/or your own server URL. - Enter your GitLab personal access token and click the OK button.
The tracker is ready! Right click the item you just edited in the list and click the Submit Test Issue option. If you configured everything properly, a test issue item should be created at https://[gitlab_server]/[owner]/[repo]/issues. If not, you will see an error message giving a hint of what needs to be done.
For more details on how to submit vulnerabilities to the GitLab tracker, see: Submitting Vulnerabilities To a Tracker.
For additional product documentation, visit syhunt.com/docs