Syhunt Dynamic: Authenticated Scan
The information in this document applies to version 6.9.28 of Syhunt Dynamic.
Table of Contents
Introduction
Syhunt Dynamic supports manual and automated authentication methods. In the case of the automated method, Syhunt Dynamic automatically detects the login form and authenticates with the credentials and methods previously configured in the Site Preferences screen. The automated method currently supports standard authentication, AI-powered form authentication, Selenium script authentication, as well as Basic, Bearer, Digest, NTLM and direct through cookie.
In the case of the manual method, the scan is started after manually logging in through the Sandcat browser, included with Syhunt Dynamic. Syhunt Dynamic automatically monitors the established session to ensure that the session was maintained from the start to end of the scan. All available methods are described below.
How to configure and test AI-powered authentication
Syhunt's innovative AI-powered form authentication method eliminates the need of using complicated login recorders to achieve login during a scan. The method automatically figures out how to login with credentials and sometimes a few instructions from the user, caching a successful login procedure to be used in future on-demand or scheduled scans. Below you can find how to enable, configure and test the AI-powered authentication.
- Make sure you're ready:
- Make sure you've entered your OpenAI API key in AI Preferences.
- Make sure you've installed the required dependencies that extend Syhunt's scripting capabilities.
- Enter the form credentials:
- Click the purple bookmark icon
 in the Launcher toolbar and add a Target URL to the list of Dynamic targets.
- Right-click the URL you just added and click the Edit Site Preferences menu option.
- Select the AI Powered option.
- Enter the username and password in the Form Authentication area of the Authentication tab.
- If you have additional form fields to fill, describe it with words in the field Extended Instructions for AI. Example: Fill in Client ID with 123456
- Click OK to save the preferences. The Site Preferences window will close.
- Click the purple bookmark icon
- Test the AI-powered authentication:
- Right-click the URL you just configured and click the AI-Powered Login -> Run Test menu option.
- If you see the Successful login message with the screenshot of the logged in page at the bottom of the screen, click the Confirm Success button. This will cache the method, allowing it to be automatically used in future scans.
- If you can see that it logged in from the screenshot at the bottom of the screen but there is an additional step required like an additional form to be filled, click the Add New Step button instead of the Confirm Success button, describe it with words (Example: fill in Client ID with 123456) and click the OK button. Finally, when you see the screenshot of the logged in page, click the Confirm Success button.
- If you see the a failure message after multiple retries, give it another try.
Now when a scan report is generated you will see the screenshot of the scanned URL after logging in and an indication if the authentication session was maintained from the start to end of the scan at the top of the report.
How to configure and test Selenium script authentication
- Make sure you've installed the required dependencies that extend Syhunt's scripting capabilities.
- Enter the form credentials
- Click the purple bookmark icon in the Launcher toolbar and add a Target URL to the list of Dynamic targets.
- Right-click the URL you just added and click the Edit Site Preferences menu option.
- Select the Selenium Script option.
- Enter the username and password in the Form Authentication area of the Authentication tab.
- Click the purple bookmark icon
- Enter a Selenium script at the Selenium tab.
- Start your Python script at the part that manipulates and submits the form.
- Do not call driver.get() at its beginning, do not call driver.quit() at its end. Syhunt will automatically take care of that.
- Enter @user@ and @pass@ within a script variable to use the username filled in the Authentication tab. Examples: username_field.send_keys('@user@') and password_field.send_keys('@pass@')
- Click OK to save the preferences. The Site Preferences window will close.
- Test the Selenium script authentication:
- Right-click the URL you just configured and click the Selenium Script Login -> Run Test menu option.
- If you see the Successful login message with the screenshot of the logged in page at the bottom of the screen, then it is ready to be automatically used in future scans.
- If you see the a failure message after multiple retries, fine tune your Selenium script.
Now when a scan report is generated you will see the screenshot of the scanned URL after logging in and an indication if the authentication session was maintained from the start to end of the scan at the top of the report.
How to enable scheduled scan with authentication
- Go to the Scheduled Scans screen (
 -> Scheduled Scans).
- Right-click on a scheduled dynamic scan and click on the option Edit Assigned Target Preferences...
- Go to the tab Authentication and enter the credentials and desired authenticated method.
How to configure and perform authenticated scan through CLI
In this case, there are two methods: a) passing the credentials through the ScanURL command, or b) leaving the credentials pre-configured through the scancore command. The second method is considered more secure as the password is not exposed while executing the ScanURL command. Examples:
-- Method A - Indicating form authentication when firing a scan
-- In this case, credentials are not permanently stored in Dynamic settings.
 scanurl http://127.0.0.1 -atype:Form -auser:yourusername -apass:yourpassword

-- Method B - Configuring Basic authentication for a specific website
-- In this case, the credentials are stored in the Dynamic settings and are reused in all scans against the indicated target.
 scancore -tg:http://127.0.0.1 -prefset:dynamic.servauth.type -v:Form
-- The available form auth types are: None, Standard, AI or Selenium. None disables the form authentication.
 scancore -tg:http://127.0.0.1 -prefset:dynamic.formauth.type -v:Standard
 scancore -tg:http://127.0.0.1 -prefset:dynamic.servauth.username -v:myuser
 scancore -tg:http://127.0.0.1 -prefset:dynamic.servauth.password -vsecret -vstring
 scanurl http://127.0.0.1

-- Method B - Setting a cookie from a file
 scancore -tg:http://127.0.0.1 -prefset:dynamic.lists.cookies -fromfile:caminho/mycookies.lst
 scanurl http://127.0.0.1
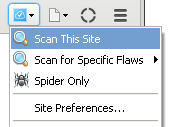
How to perform manual authenticated scan
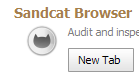
You can launch the scan from within the Sandcat browser after logging in to a website.
- Launch Syhunt Hybrid and double-click the Sandcat Browser icon or New Tab button in the welcome page.
- Navigate to the website you want to scan - enter the target URL using the address bar and press Enter.
- Go to the Login area and login using your credentials.
- Click the Scan This Site menu option to start the scan.
If you have Syhunt version 6.9.26 or superior, Syhunt will indicate in the session details area of the report if the session started manually was maintained from the beginning till the end of the scan with a Authenticated Session Maintained: Yes.
Alternate method: How to perform authenticated scan via external browser
Note: this method does not work with the latest version of browsers and will be reviewed soon. Alternatively, you can manually login using an external browser like Google Chrome or Mozilla Firefox:
- Launch Syhunt Hybrid and click the lock button in the welcome page.
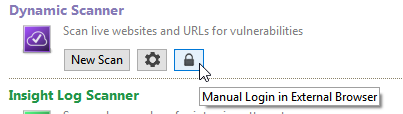
- Follow the instructions that will appear at the bottom of the Syhunt screen.
If you have Syhunt version 6.9.26 or superior, Syhunt will indicate in the session details area of the report if the session started manually was maintained from the beginning till the end of the scan with a Authenticated Session Maintained: Yes.
How to configure standard automated authenticated scan
- Click the purple bookmark icon in the Launcher toolbar and add a Target URL to the list of Dynamic targets.
- Right-click the URL you just added and click the Edit Site Preferences menu option.
- Enter the username and password in the Form Authentication area of the Authentication tab.
- Select the Standard authentication option.
- Click OK to save the preferences. The Site Preferences window will close.
Extending AutoComplete on Standard Authentication
Note: The below procedure was designed for the classic Standard authentication type, and not for AI-Powered or Selenium script authentication, which take care of form filling using different ways and options.
In the case of a web form with fields other than username and password, or that use input names that deviate from the standard, Syhunt Dynamic must be taught to fill in such fields, as shown in the example below.
Example form with additional fields
<input name="ClientUTBox" id="ClientUTBox" type="hidden" value="1234">
<input name="ClientUNBox" id="ClientUNBox" type="text" class="InputBox"/>User Name
<input name="ClientPWBox" id="ClientPWBox" type="password" class="InputBox" >Password
The following procedure will reprogram Syhunt to fill in the additional fields:
- Go to the Dynamic Preferences screen ( -> Preferences -> Dynamic Preferences).
- Go to the Emulation tab, click the Custom Values button and add the following values:
ClientUTBox=1234ClientUNBox=@syhunt_web_form_usernameClientPWBox=@syhunt_web_form_password
Values above after the equal sign starting with an @ are internal variables, they ensure that the web form login information you entered in the Site Preferences screen is used in the two form inputs you provided. Once the above configuration is saved, Syhunt Dynamic will be ready to perform the login during the scan.
Preventing Accidental Logout
Syhunt Dynamic can auto-detect most logout pages, but if the logout page does not match standard names and common patterns, you will need to add the logout page URL to your Site Preferences. This will prevent Syhunt Dynamic from accidentally logging out during a scan:
- Click the purple bookmark icon in the Launcher toolbar and right click to Edit Site Preferences of the target.
- Go to the Exclusions tab
- Click the Logout URLs button and add the custom logout URL, example:
/getmeout.php
- Click OK to confirm the preferences. The input dialog will close.
- Hit OK to save the preferences.
Using Client Certificates
SSL support in Syhunt Dynamic relies on libraries developed by the OpenSSL Project and included with the product and allow you to scan secure sites with https addresses.
The Site Preferences screen allows you to configure the client certificates. To view this screen, navigate to the website you want to scan, click the scan button ![]() -> Site Preferences and go to Certificates tab.
-> Site Preferences and go to Certificates tab.