Integrating Syhunt into Jenkins
The information in this document applies to version 6.9.12 of Syhunt Hybrid.
Table of Contents
Syhunt scans can be easily executed from within a Jenkins Pipeline script, allowing you to integrate the Syhunt Dynamic, Syhunt Code and Syhunt Mobile tools into your continuous delivery pipeline, schedule scans and more.
Where to Install Syhunt
Today, Syhunt can be installed on 1) a Jenkins machine, which makes Syhunt and the Jenkins server to co-exist on the same machine or 2) a secondary Jenkins machine that will work as Jenkins agent and be called remotely by a master Jenkins server/machine via SSH connection.
It is considered a best and common practice to make the use of CI agents in DevOps environments and, for that reason, we strongly recommend the second option. For security and performance reasons, in production environments, it is also considered a best practice to have a dedicated machine working as an agent.
Whether you want to have Syhunt running on Windows or Linux, remember to install Syhunt after deploying and setting up Jenkins. This way the Syhunt setup will detect your Jenkins installation and automatically install the required extensions. If, by accident, you install Syhunt before Jenkins, you will just need to run the Syhunt setup again.
It is important to remember that Syhunt is, as documented, licensed per device and multiple agents will require multiple licenses - one per device.
Activating a Syhunt Agent
After deploying and setting up both the master and slave Jenkins installations, follow the following steps to make the agent available through the master Jenkins installation:
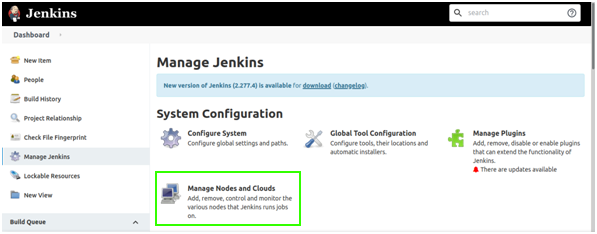
- From the Jenkins Dashboard (the master one), click Manage Jenkins from the sidebar links:

- Under System Configuration, click Manage Nodes and Clouds:
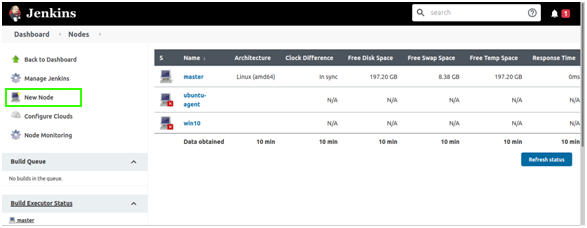
- Under the Nodes screen, click New Node from the sidebar links:
- Give a name to the node:
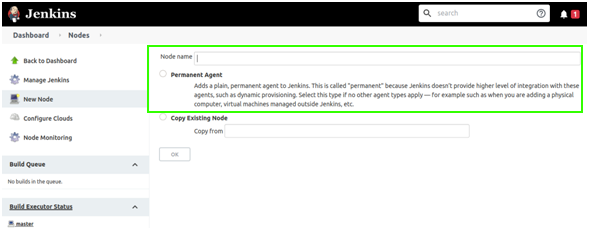
- Select the option Permanent Agent and click the OK button.
- Update the option # of executor to: 2:
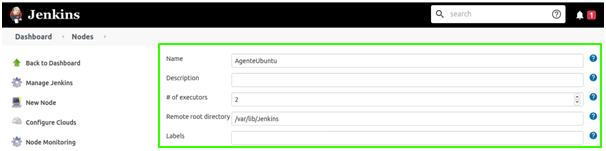
- Update remote root directory to the Jenkins installation directory:
/var/lib/jenkins- In Windows, you must set the remote root directory to the .jenkins directory, which usually is
C:\Users\[youruser]\.jenkinsorC:\windows\system32\config\systemprofile\AppData\Local\Jenkins\.jenkins. - Check which path exists on the slave machine and enter the appropriate one in remote root directory.
- In Windows, you must set the remote root directory to the .jenkins directory, which usually is
- Give a label to the node that can be used later to refer to this node. Eg: Syhunt
- Keep Usage unchanged/default:
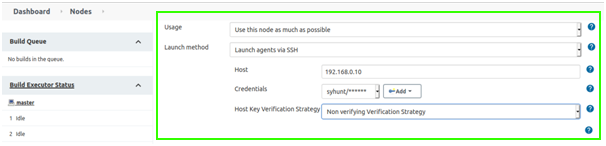
- Change Launch method to: Launch agents via SSH.
- Enter the host of the slave Jenkins machine, which can be an IP address.
- Under Credentials click Add and insert username and password of the slave Jenkins user.
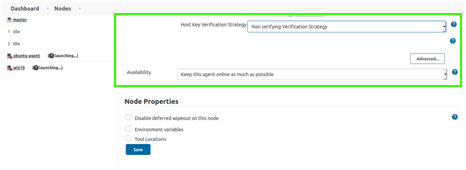
- If you do not have a SSH credential, change Host Key Verification Strategy to: Non verifying Verification Strategy:
- If you created a Jenkins SSH credential in the slave Jenkins installation, as indicated in the Jenkins documentation, change Host Key Verification Strategy to: Manually provided key Verification Strategy
- It is recommended to use a Verification Strategy for better security, especially when in production.
- Keep Availability unchanged/default.
- Click the Save button.
- Give a name to the node:
- Finally, if you have not done so yet, install Syhunt to the secondary machine that has the slave Jenkins installation as explained below.
Before Installing Syhunt (Windows)
After deploying and setting up Jenkins:
- If you use scanCode() to scan a GIT URL, you will need to install Git for Windows, which can be downloaded at https://gitforwindows.org/
- You're ready to install Syhunt, as documented in the Installation Guide.
Before Installing Syhunt (Linux)
After deploying and setting up Jenkins, remember to change the Jenkins user to the current user (as long as it is not root) or an appropriate user of your choice - we recommend against running the Jenkins user as root, since this could expose the operating system and Jenkins repositories:
- If you are on CentOS: sudo vim /etc/sysconfig/jenkins or sudo vi /etc/sysconfig/jenkins
- If you are on Ubuntu: sudo vim /etc/default/jenkins or sudo vi /etc/default/jenkins
- Update the variable
JENKINS_USER="jenkins"toJENKINS_USER="userofyourchoice" - Change the ownership of the main Jenkins directories to the new Jenkins user:
- sudo chown -R user:userofyourchoice /var/lib/jenkins
- sudo chown -R user:userofyourchoice /var/log/jenkins
- sudo chown -R user:userofyourchoice /var/cache/jenkins
- Restart Jenkins: sudo systemctl restart jenkins
- Logged in as userofyourchoice, you're ready to install Syhunt, as documented in the Installation Guide for Linux
- If you use scanCode() to scan a GIT URL, you will need to install Git on Linux, as documented in the above link.
Adding Syhunt to your Pipeline script
- From the Jenkins Dashboard, open the desired pipeline item.
- Click Configure from the sidebar links
- Go to the Pipeline tab and uncheck the "Use Groovy Sandbox" option if checked
- Insert the below code at the appropriate position of your pipeline script:
def rootDir = pwd()
def syhunt = load "${rootDir}/../workspace@script/syhunt/syhunt.groovy"
syhunt.scanURL([target: 'http://somewebsite.com/', huntMethod: 'appscan', pfcond: 'fail-if-risk=mediumup'])
Example:
#!/usr/bin/env groovy

# If you are not using agent functionality, remember to change the below line to just: node {
node ("Syhunt") {
    stage('Scan') {
        def rootDir = pwd()
        def syhunt = load "${rootDir}/../workspace@script/syhunt/syhunt.groovy"
        syhunt.scanURL([target: 'http://somewebsite.com/', huntMethod: 'appscan', pfcond: 'fail-if:risk=mediumup'])
    }
}
Click the Save button to update the pipeline configuration.
Running the Build
After building and executing the above pipeline script, the Console Output for the project should contain something like:
Pipeline] echo
Preparing to scan URL: http://somewebsite.com/
[Pipeline] echo
VULNERABLE!
Found 2 vulnerabilities
SYHUNT URLSCAN 6.8.5.4 PLATINUM EDITION (c) 2020 Syhunt
...
[Pipeline] echo
Build problem: found Medium risk vulnerabilities.
[Pipeline] }
[Pipeline] // stage
[Pipeline] }
[Pipeline] // node
[Pipeline] End of Pipeline
Finished: FAILURE
scanURL Function
Syhunt Dynamic can be launched through the scanURL() function. The following parameters must be provided when calling the scanURL() function:
- target - the target URL to be scanned (eg. http://www.somesite.com)
- huntMethod (optional) - the Hunt Method to be used during the scan, If omitted, the default method will be used.
- pfcond (optional) - allows the build to fail if a certain condition is met. See below a list of available pass/fail conditions.
- timelimit (optional) - sets the maximum scan time limit (default: no limit). If the time is reached, the scan is aborted. Examples: 1d, 3h, 2h30m, 50m
After executing, the scanURL() function returns a map containing the following keys:
- outFilename - The filename of the generated scan report
- outResultHTML - The contents of the generated scan report in HTML text format.
scanCode Function
Syhunt Code can be launched through the scanCode() function. The following parameters must be provided when calling the scanCode() function:
- target - the target URL of a project repository, local source code directory or file to be scanned
- huntMethod (optional) - the Hunt Method to be used during the scan. If omitted, the default method will be used.
- pfcond (optional) - allows the build to fail if a certain condition is met. See below a list of available pass/fail conditions.
- branch (optional) - the branch of the GIT repository to be scanned. If omitted, the git client will fetch the default branch. This parameter is not necessary if the target is a local directory or file.
- timelimit (optional) - sets the maximum scan time limit (default: no limit). If the time is reached, the scan is aborted. Examples: 1d, 3h, 2h30m, 50m
After executing, the scanCode() function returns a map containing the following keys:
- outFilename - The filename of the generated scan report
- outResultHTML - The contents of the generated scan report in HTML text format.
Examples:
syhunt.scanCode([target: 'https://github.com/someuser/somerepo.git', huntMethod: 'normal', pfcond: 'fail-if:risk=mediumup'])
syhunt.scanCode([target: 'C:\\www\\', huntMethod: 'normal', pfcond: 'fail-if:risk=mediumup'])
Pass/Fail Conditions
The following are the pass/fail conditions currently supported by Syhunt:
highorfail-if:risk=high- Fail if a High risk vulnerability or threat is foundmediumorfail-if:risk=mediumup- Fail if a Medium or High risk vulnerability or threat is foundloworfail-if:risk=lowup- Fail if a Low, Medium or High risk vulnerability or threat is found
Scheduling Scans
- From the Jenkins Dashboard, open the desired pipeline item.
- Click Configure from the sidebar links
- Go to the Build Triggers tab, check the "Build periodically" option and enter the appropriate schedule
- Click the Save button to update the pipeline configuration
For additional product documentation, visit syhunt.com/docs